“Learning never exhausts the mind.”
― Leonardo da Vinci
“Learning is not attained by chance, it must be sought for with ardor and attended to with diligence.”
― Abigail Adams
“An investment in knowledge pays the best interest.”
— Benjamin Franklin
To be a photographer in general and wildlife photographer in particular, there are things you should know and things you must know. Because of the challenging lighting conditions, unpredictable subjects, and variable environments wildlife photographers deal with, knowing how to get the correct exposure supersedes everything else. Correct exposure is the cornerstone of all photography. Grasp exposure and your journey into wildlife photography will be rich and enjoyable. Fail to understand exposure and the journey will be miserable. So let’s learn something about exposure.
What is photographic exposure?
Photographic exposure is the process of capturing the right amount of light on the camera’s digital sensor or film to create an image that is properly exposed. Exposure is one of the fundamental elements of photography, and mastering it is essential to creating high-quality images. In this article, we will explore what photographic exposure is, what constitutes good exposure, the exposure triangle, and how the parameters of light, shutter speed, aperture, and ISO affect exposure.
Photographic exposure is fundamentally determined by three factors: the amount of light that enters the camera, the length of time the light is allowed to enter, and the sensitivity of the camera’s sensor or film to light. An underexposed photograph has too little light, and as a result, it appears dark and lacks detail in the shadows. On the other hand, an overexposed photograph has too much light, and it appears bright and washed out, with blown-out highlights.
What Constitutes Good Exposure
The goal of good exposure is to capture enough light to create an image with detail in both the highlights and shadows while maintaining the proper overall brightness. However, there are times when a photographer may not want to achieve proper exposure. Intentionally underexposing or overexposing a photograph can be a creative choice to achieve a certain look or mood. For example, underexposing a photograph can create a moody or mysterious atmosphere, while overexposing a photograph can create a dreamy or ethereal feeling. Intentionally creating an improper exposure can also be used to create a silhouette effect, to emphasize a particular subject in a scene, or to capture motion blur. Ultimately, the decision to aim for proper exposure or not depends on the photographer’s artistic intent and the message they want to convey through their photograph.
What’s the exposure triangle
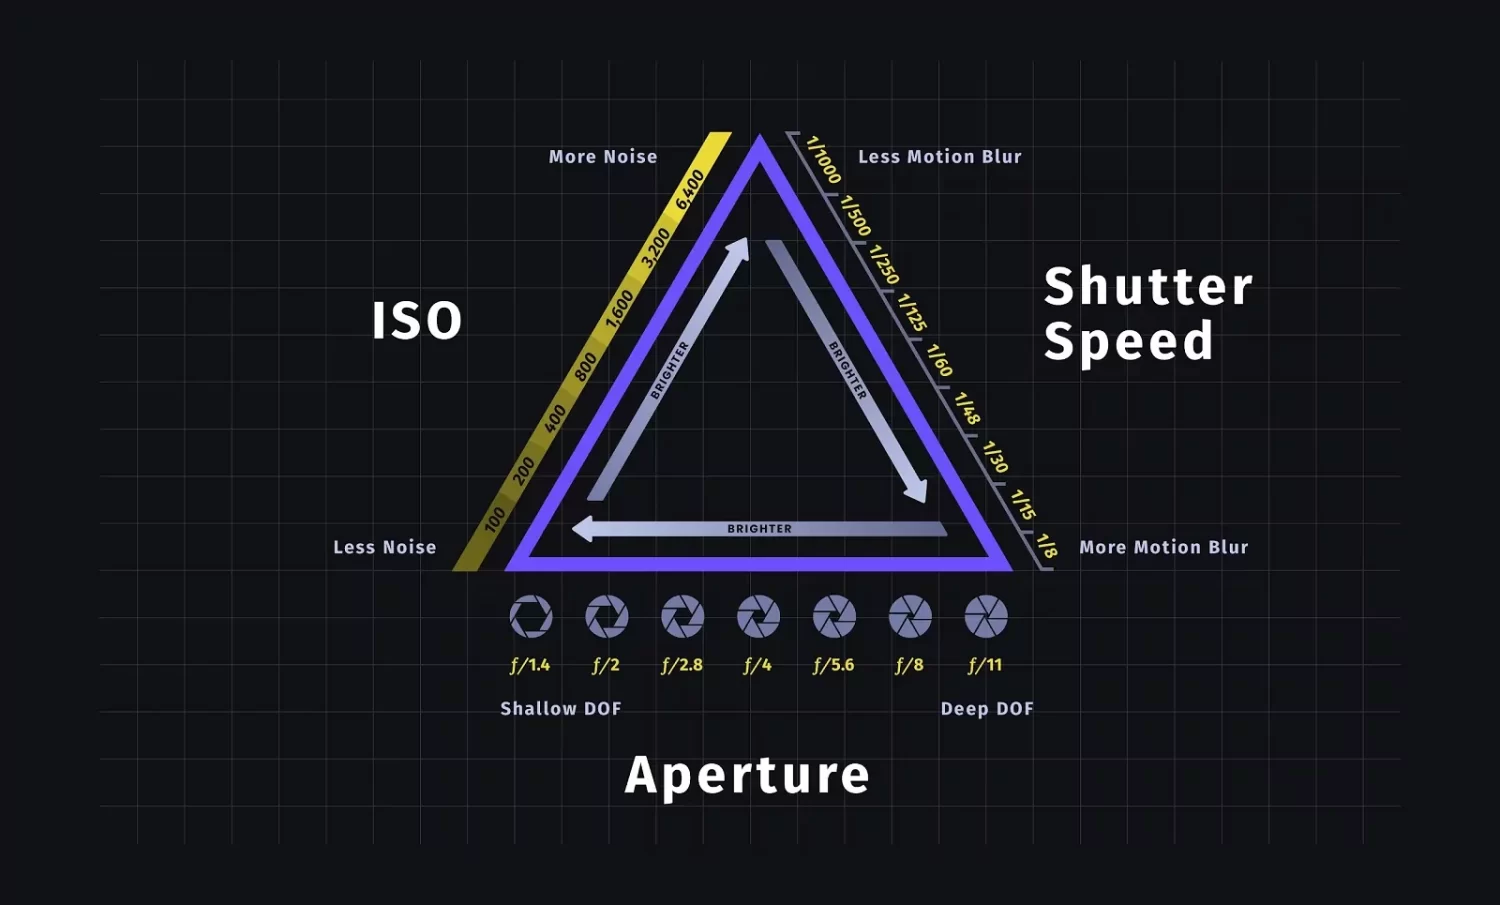
The exposure triangle is a fundamental concept in photography that describes the relationship between three key factors that determine the exposure of a photograph: aperture, shutter speed, and ISO. Understanding how these three parameters work together is essential to creating properly exposed images. Furthermore understanding these parameters allows creative expression with depth of field and motion blur. Let’s individually explore each parameter and how each affects exposure.
Aperture
The aperture is the opening in the lens through which light enters the camera. It is measured in f-stops, such as f/2.8, f/4, f/5.6, f/8, f/11, and so on. Each f-stop represents a halving or doubling of the amount of light that enters the camera. A wider aperture (represented by a lower f-number) lets in more light, while a smaller aperture (represented by a higher f-number) lets in less light. Because it controls the amount of light that enters the camera, the aperture affects exposure. This is why the aperture is one of the three main components of exposure.
Depth of field is the range of distance in the scene that appears acceptably sharp in the final image. Aperture affects depth of field because it determines how much of the scene is in focus. When the aperture is wide open (i.e. a low f-number), only a narrow range of distances in the scene will be in focus, while the rest of the image will be blurred. This creates a shallow depth of field, which can be useful for isolating a subject from the background or emphasizing a particular element of the scene.
On the other hand, when the aperture is closed down (i.e. a high f-number), a larger range of distances in the scene will be in focus, creating a deep depth of field. This can be useful for landscape photography or when the photographer wants to capture all elements of the scene in focus.
The physics behind this is related to the way light travels through the lens and interacts with the camera’s sensor or film. When light enters the camera through a wide aperture, it converges onto a smaller area of the sensor, creating a shallower depth of field. Conversely, when light enters through a smaller aperture, it converges onto a larger area of the sensor, creating a deeper depth of field.
Understanding aperture and depth of field is important to photography because it allows the photographer to control how much of the scene is in focus, which can significantly impact the visual impact and storytelling of the image. By choosing the right aperture setting, the photographer can create a mood, emphasize a subject, or capture a specific element of the scene.
Shutter speed
Shutter speed is the amount of time that the camera’s shutter remains open when taking a photo. It is measured in seconds or fractions of a second, such as 1/1000s, 1/250s, 1/60s, and so on. Shutter speed as well, is one of the primary components of exposure.
A fast shutter speed lets in less light, while a slow shutter speed lets in more light. Therefore, shutter speed affects the overall brightness of the image, as well as the balance between light and shadow.
One of the main ways that shutter speed affects photography is by controlling the amount of motion blur in the image. A fast shutter speed (such as 1/1000s) freezes motion, while a slow shutter speed (such as 1/10s) allows motion blur. For example, in sports photography, a fast shutter speed is often used to freeze the action and capture sharp images of athletes in motion, while in artistic photography, a slow shutter speed can be used to create a sense of movement and blur.
Shutter speed can affect the depth of field. A fast shutter speed (such as 1/1000s) can freeze motion, which can allow for a wider aperture (lower f-number), creating a shallower depth of field. Conversely, a slower shutter speed (such as 1/10s) requires a narrower aperture (higher f-number), creating a deeper depth of field.
When using slow shutter speeds, camera shake can become a problem. Camera shake is the result of small movements in the camera during exposure, which can create a blurry image. To avoid camera shake, photographers can use a tripod or other stabilizing equipment, or increase the shutter speed to ensure that the camera remains stable during exposure.
Shutter speed can also be used creatively to create unique effects in the image. For example, a long exposure can create streaks of light or create a dreamy, ethereal look, while a short exposure can create a sense of tension and urgency.
Understanding how shutter speed affects motion and other aspects of photography is essential for photographers to achieve the desired result in their images. By adjusting the shutter speed, photographers can control the amount of motion blur, exposure, depth of field, camera shake, and creative effects in the image.
ISO
ISO, which stands for International Organization for Standardization. In photography, it is an important factor that determines the exposure of an image. It is used to adjust the camera’s sensitivity to light, which is measured in stops, and is represented by a numerical value. In terms of physics, the ISO setting affects the sensitivity of the camera’s image sensor to light. When a photon of light strikes the camera’s sensor an electrical signal is produced by the sensor. When you increase the ISO setting, the camera will amplify the signal from each pixel on the sensor to make the image brighter. However, this amplification can also amplify the noise in the image, which can result in a grainy or speckled appearance.
The ISO value can range from as low as 50 to as high as 204,800, and the higher the number, the more sensitive the camera is to light. In other words, a higher ISO setting will allow the camera to capture images in low light conditions, but it will also introduce noise or grain to the image as a result.
So, when you are shooting in low light conditions, you may need to increase the ISO to get a brighter image. However, it is important to find a balance between the ISO and other exposure settings, as increasing the ISO can also reduce the dynamic range of the image affecting color and it will introduce noise.
Understanding the relationship between aperture, shutter speed, and ISO is essential to creating properly exposed images and achieving creative control over depth of field and motion. Balancing these parameters requires practice and experimentation, but mastering the exposure triangle is an essential step in developing one’s photographic skills.
In review, to create a properly exposed image with a shallow depth of field (a large aperture) in low light conditions (requiring a high ISO), the shutter speed must be slowed down to allow enough light to enter the camera. However, a slower shutter speed can be detrimental and result in motion blur if the subject or camera moves during the exposure. Alternatively, if the goal is to freeze motion (requiring a fast shutter speed) in bright light conditions (allowing a low ISO), a smaller aperture may be necessary to limit the amount of light entering the camera. However, a smaller aperture will increase the depth of field, potentially making it more difficult to isolate the subject.
What else can affect exposure?
While, shutter speed, aperture, and ISO are the three primary components of photographic exposure, they are not the only factors that can affect exposure. Let’s see what some of these other factors are.
Light quality and direction: The quality and direction of light can affect the exposure and the mood of the image. For example, soft, diffused light can result in a lower contrast, while harsh, direct light can create strong shadows and contrast.
Color temperature: The color temperature of the light can also affect the exposure and color balance of the image. For example, warmer light (such as candlelight or sunrise/sunset) can create a warmer color cast, while cooler light (such as fluorescent or overcast skies) can create a cooler color cast.
Dynamic range: Dynamic range refers to the range of brightness in a scene, from the darkest shadows to the brightest highlights. A high dynamic range scene can be challenging to expose properly, as the camera may struggle to capture detail in both the shadows and highlights. Techniques such as HDR (High Dynamic Range) photography can help to overcome this challenge.
Filters: Filters such as polarizers or neutral density filters can be used to control the amount of light entering the camera, affecting the exposure and allowing for creative control over depth of field and motion.
Exposure compensation: Exposure compensation is a feature on many cameras that allows the photographer to adjust the exposure by adding or subtracting stops of light from the camera’s automatic exposure settings.
Metering modes: The camera’s metering system measures the amount of light in a scene and calculates the appropriate exposure settings. Different metering modes, such as spot metering or matrix metering, can affect how the camera determines the exposure.
Exposure bracketing: Exposure bracketing is a technique in which the camera takes several images at different exposures, allowing the photographer to choose the best exposure later.
Understanding these additional factors and how they affect exposure can help photographers achieve the desired result in their images. However, shutter speed, aperture, and ISO remain the primary components of photographic exposure and are essential to understanding exposure and creating correctly exposed images.
The “Stop of Light”
The final and perhaps most crucial concept to learn concerning exposure is to understand what a “stop of light” is. A stop of light refers to a measurement of exposure that doubles or halves the amount of light entering the camera. Let’s read that again, A stop of light refers to a measurement of exposure that doubles or halves the amount of light entering the camera. It is a term used to describe the change in exposure caused by adjusting one of the three primary exposure controls: aperture, shutter speed, or ISO.
Each stop of light either doubles or halves the amount of light, depending on whether you are increasing or decreasing the exposure. For example, increasing the exposure by one stop of light means doubling the amount of light entering the camera, while decreasing the exposure by one stop of light means halving the amount of light.
The term stop is derived from the physical stops used in older cameras to regulate the amount of light entering the camera. These stops were physical devices, such as blades or discs, which could be adjusted to control the aperture or shutter speed.
In modern digital cameras, stops of light are still used to adjust exposure, but they are represented by numbers on the camera’s settings. For example, if you increase the shutter speed from 1/125s to 1/250s, you are decreasing the exposure by one stop of light. Similarly, if you increase the aperture from f/8 to f/5.6, you are increasing the exposure by one stop of light.
Understanding stops of light is essential in photography because it allows you to adjust exposure quickly and accurately. For example, if you want to adjust the exposure by two stops of light, you can adjust the aperture or shutter speed by two stops, rather than making multiple adjustments to find the correct exposure.
Understanding stops of light can help you maintain consistent exposure across different shooting conditions. For example, if you know that increasing the ISO by one stop of light doubles the sensitivity of the camera’s sensor, you can adjust the ISO accordingly when shooting in low-light conditions to maintain consistent exposure levels.
Overall, stops of light are a fundamental concept in photography that help photographers adjust exposure accurately and consistently, making it an essential skill for any photographer to master.
It is vital to understand that for a given lighting condition, different combinations of the three main components, (shutter speed, Fstop, and ISO), can give the exact same exposure. It is possible therefore to have the same exposure with different combinations of ISO, aperture, and shutter speed settings. This is because each of these settings affects the exposure differently and can be adjusted to compensate for changes in the others.
Now let’s consider an example where we want to take a photo of a subject in a given lighting situation with a specific exposure level. We could achieve the desired exposure level in several ways by adjusting the ISO, aperture, and shutter speed settings.
For example, if we set our camera to ISO 100, f/5.6 aperture, and 1/125 second shutter speed, we might get the correct exposure level for the scene. However, we could also achieve the same exposure level by adjusting the settings in the following ways:
Increase the ISO: We could increase the ISO to 200, This would double the sensitivity of the sensor, allowing us to use a faster shutter speed of 1/250 or a narrower aperture of f/4 to maintain the same exposure level.
Adjust the aperture: We could adjust the aperture to f/8. This would decrease the amount of light entering the camera by half, and increase the depth of field. but we would have to compensate by lowering the shutter speed to 1/50 second to maintain the same exposure level.
Adjust the shutter speed: We could adjust the shutter speed to 1/500 second. This would allow less light to enter the camera, and freeze action better but we would have to compensate by decreasing the aperture to f/4 or increasing the ISO to 300 to maintain the same exposure level.
All of these adjustments result in the same exposure level, but they each have different effects on the image. Increasing the ISO may introduce noise or grain to the image, while decreasing the aperture may result in a shallower depth of field. Adjusting the shutter speed can affect how motion is captured in the image.
Achieving the same exposure level with different combinations of ISO, aperture, and shutter speed settings is possible because each setting affects the exposure differently. Understanding how these settings work together is essential for photographers to achieve the desired exposure level and creative effect in their images.
In conclusion, wildlife photography often involves capturing fast-moving subjects in a variety of lighting conditions. An in-depth understanding of exposure allows photographers to adjust their camera settings quickly to properly expose the subject. In addition, exposure is one of the key creative elements in photography. Good exposure allows wildlife photographers to achieve their desired creative effect. Understanding how to achieve proper exposure is essential for wildlife photographers looking to capture stunning and impactful images. Proper exposure involves finding the right balance between shutter speed, aperture, and ISO, as well as understanding the nuances of lighting and metering. By mastering the art of exposure, you can ensure that your images are sharp, well-lit, and correctly color-balanced, highlighting the beauty and detail of the natural world. Moreover, the ability to achieve proper exposure is crucial for photographers looking to take their craft to the next level, allowing them to experiment with different lighting conditions, camera settings, and post-processing techniques. Whether you are a beginner or an experienced wildlife photographer, understanding how to achieve proper exposure is a vital skill that can make all the difference in the quality of your images.