A French priest in the 17th century, Saint Vincent de Paul, once said, “Noise makes no good, good makes no noise”. At the time he was referring to the importance of doing good deeds without seeking attention or recognition. If he were alive today he might have said something similar in regard to digital photography. Photographic noise isn’t good and good photos don’t have noise.
What is photographic noise
Camera noise refers to the visual graininess or speckles that can appear in photographs, particularly in images taken in low-light conditions. It is caused by the camera’s image sensor. This can result in random variations in brightness and color that can appear as visual noise in the final image.
Camera noise is generally more noticeable in images taken at high ISO settings. ISO in photography refers to the sensitivity of the camera’s image sensor to light. It is an acronym for the International Organization for Standardization, which is the body that sets standards for a wide range of industries, including photography. ISO is one of the three key exposure settings, along with shutter speed and aperture, that determine how much light enters the camera and ultimately affects the brightness and clarity of the resulting image. A higher ISO setting will make the camera’s sensor more sensitive to light, allowing it to capture images in low light conditions or at faster shutter speeds. ISO is usually represented as a numeric value, such as ISO 100, ISO 400, or ISO 3200. Lower ISO values (such as ISO 100) are used in bright conditions or when a photographer wants to capture a sharp, noise-free image, while higher ISO values (such as ISO 3200) are used in low light conditions when a photographer wants to use a high shutter speed in order to capture a fast-moving subject without blur.
As mentioned previously, using high ISO settings causes noise in photographs because it increases the sensitivity of the camera sensor to light, amplifying both the signal from the incoming light and any electrical signals or heat generated by the sensor itself. When the camera sensor amplifies the signal from the light, it also amplifies any noise that may be present in the signal, resulting in visual graininess or speckles that can appear in the final image. At low ISO settings, the camera sensor does not amplify the signal as much, resulting in less noise in the final image. However, in low-light situations, using a low ISO setting may result in an underexposed image that lacks detail and requires longer exposure times that can cause motion blur.
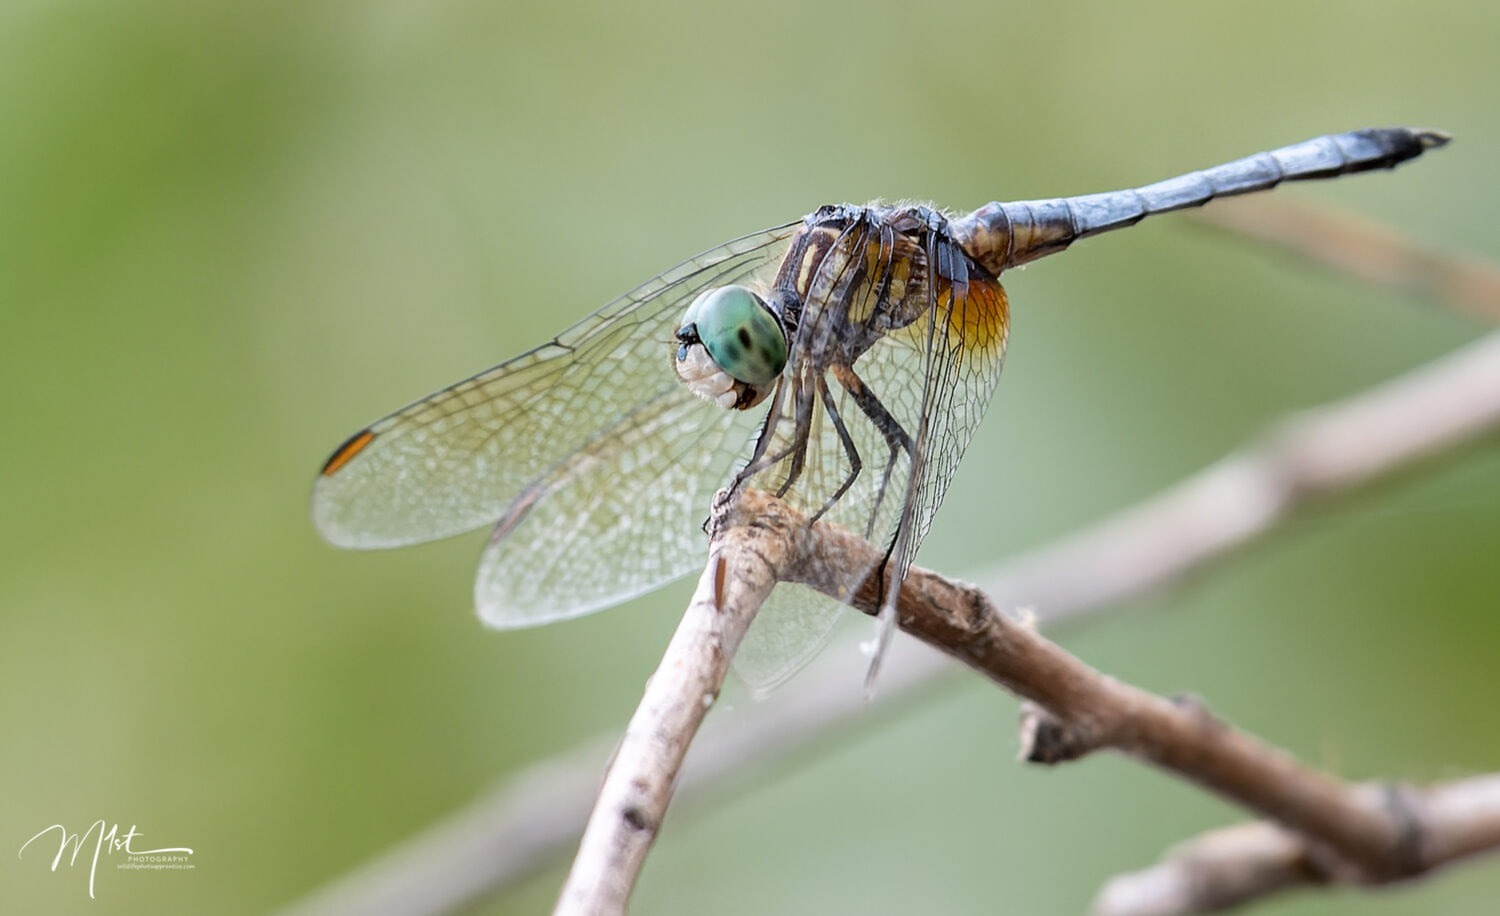
Wildlife photography often requires the use of high ISO settings because animals are most active during low light conditions such as dawn, dusk, or in heavily forested areas. In these situations, there may not be enough light for the camera to capture a sharp and well-exposed image without setting a high ISO.

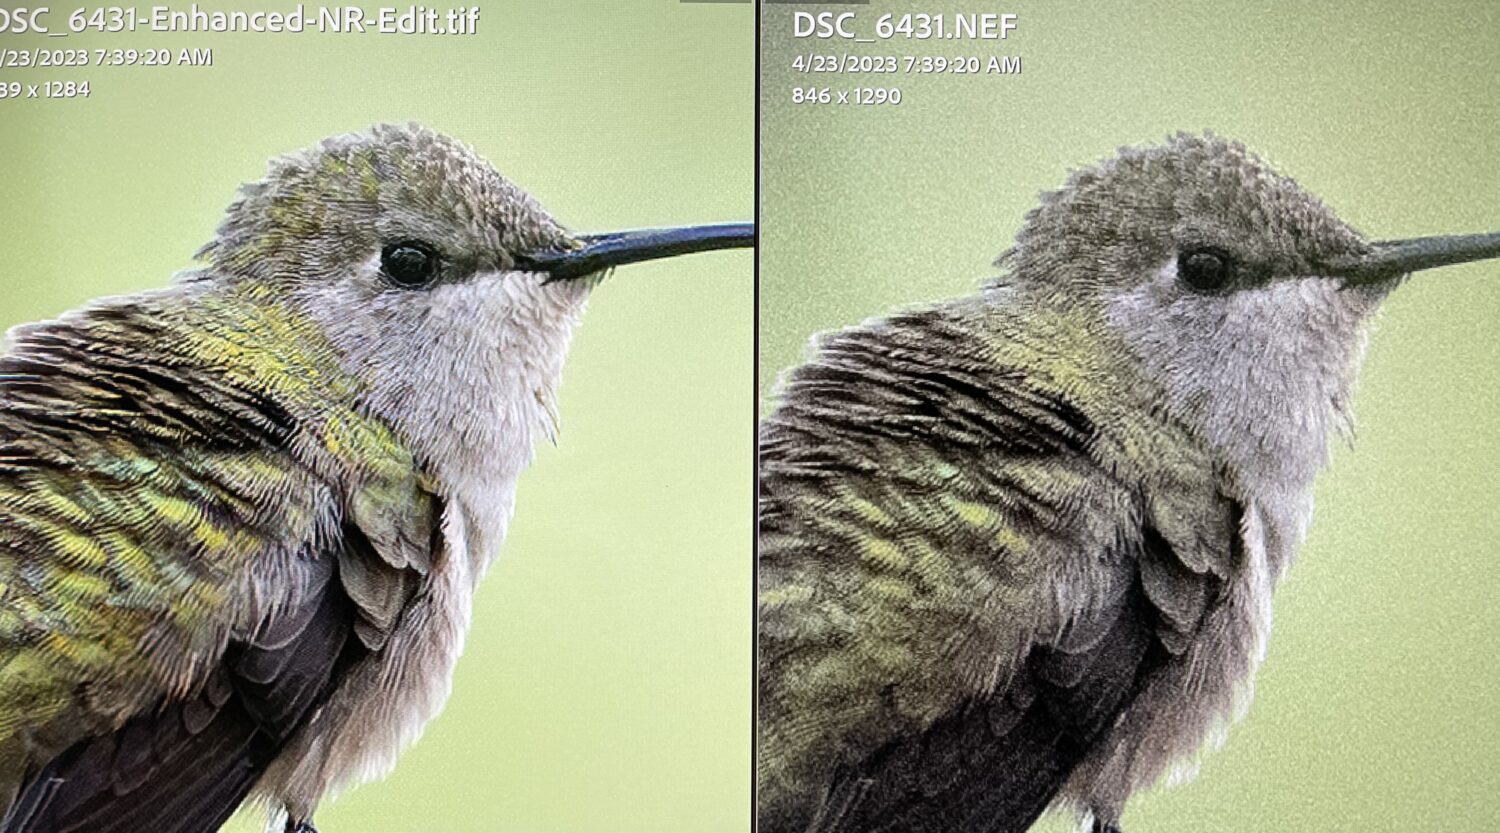
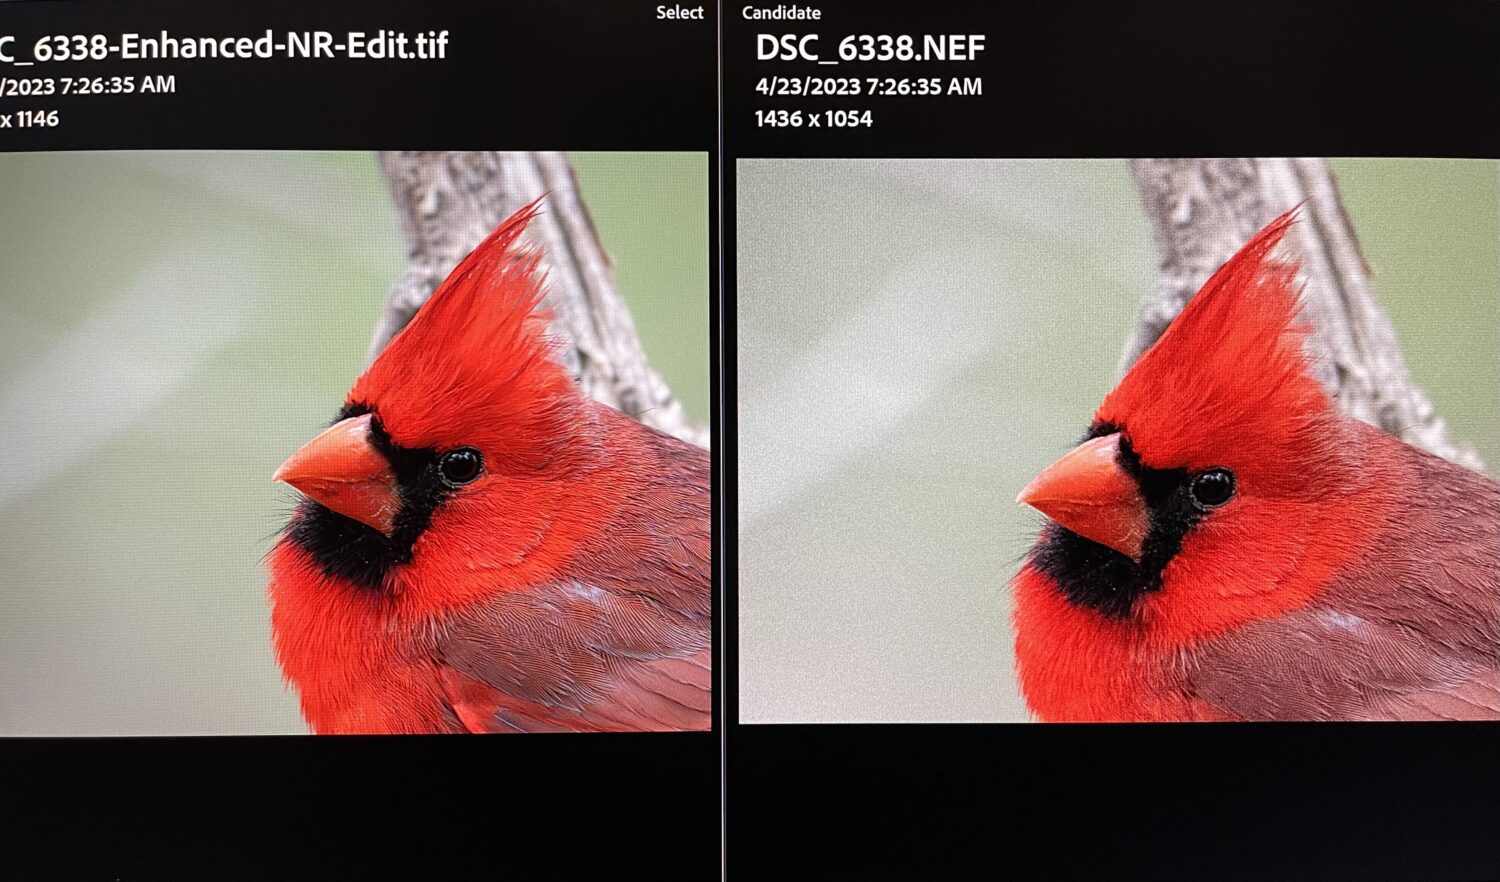
Additionally, in many wildlife photography situations, especially if the animal or bird is moving quickly or unpredictably, the use of a very fast shutter speed to freeze the motion of the subject is required. Setting ISO in the 3200 to 6400 range allows the photographer to maintain a fast shutter speed even in low light conditions, which is crucial in this scenario. High ISO and therefore noisy images are a normal part of wildlife photography. it’s important to know what we can do in post-processing to eliminate noise and achieve outstanding results even under these conditions. There are several excellent software programs that can be used in post-processing to reduce or eliminate noise in your wildlife photos that also do not lead to an unacceptable loss of sharpness or detail in the image.
Getting rid of noise in your photos
Currently, in my opinion, the three most popular are DXO Pure Raw 6, Lightroom Classic, and Topaz Photo. These denoise programs use various algorithms and techniques to remove noise from images. The specific methods used can vary depending on the program, but here are some common techniques.
Statistical analysis is a common procedure. Many denoise programs use statistical analysis to distinguish between signal and noise in an image. They analyze the pixels in the image to determine which ones are most likely to contain noise, and then apply a filter that reduces the noise without affecting the signal.
Fourier transform is a different operation. Denoise programs can use Fourier transform to analyze the image and remove high-frequency noise. The Fourier transform separates an image into its component frequencies, which allows the program to target and remove high-frequency noise. Fourier transform is a mathematical tool that is commonly used in signal processing, image processing, and other areas of science and engineering. It is named after the French mathematician Joseph Fourier, who first introduced the concept in the early 19th century. In image processing, Fourier transform is used to analyze the frequency content of an image. It breaks down the image into its component spatial frequencies, which can then be filtered or modified in various ways. For example, a high-pass filter can be applied to an image to remove low-frequency components, which can help to remove noise or smooth the image. A low-pass filter can be used to remove high-frequency components, which can help to sharpen the image. Overall, Fourier transform is a powerful tool for analyzing images in the frequency domain, and it has many applications in fields ranging from audio and video processing to medical imaging and beyond.
A similar method is Wavelet transform. Wavelet transform is a mathematical tool that is commonly used in image processing to analyze and modify images in a way that is similar to Fourier transform but with some key differences. While Fourier transform decomposes an image into a set of sinusoidal waves of different frequencies, wavelet transform decomposes the image into a set of wavelets, which are small waves that are localized both in time and frequency. Unlike the sinusoidal waves used in Fourier transform, wavelets have a finite duration, which allows them to capture localized features of an image. This makes wavelet transform particularly useful for analyzing images that have features that vary in both frequency and time. Wavelet transform can be used in many applications, including image compression, signal denoising, feature extraction, and more. For example, in image compression, wavelet transform can be used to break an image down into a set of wavelets that can be compressed more efficiently than the original image.
Some programs utilize Machine learning. Machine learning algorithms analyze the image and learn patterns of noise in different types of images. Once the program has learned these patterns, it can use them to remove noise from similar images. Machine learning is increasingly being used in denoise programs to get rid of noise in images. Specifically, machine learning algorithms can be trained on a large dataset of noisy and noise-free images, to learn the statistical patterns of noise and the underlying clean signal. Once the machine learning algorithm has been trained, it can be used to automatically denoise new images by predicting the underlying clean signal based on the noisy input image.
One common approach is to use a type of machine learning called deep learning, which involves training a neural network to learn the mapping between noisy and clean images. The neural network is typically trained on a large dataset of paired noisy and clean images, and it learns to map the noisy image to a corresponding clean image. Once the network has been trained, it can be used to denoise new images by passing them through the network and using the output as the denoised image.
Another approach is to use a technique called non-local means denoising, which uses machine learning to learn the statistical patterns of noise and the underlying clean signal in a patch-based manner. This approach involves breaking the image up into small patches and then learning the statistical patterns of noise and the underlying clean signal within each patch. The machine learning algorithm can then be used to predict the clean signal within each patch, which can be used to reconstruct the entire image.
Next is Averaging. A simple denoise technique involves taking multiple images of the same scene and averaging them together. Since noise is random and not present in the same way in every image, averaging multiple images can reduce the overall noise in the final image.
Ultimately, denoise programs apply a combination of these techniques to remove noise from images while preserving details and image quality. The specific methods used can vary depending on the program and the image being processed.
Denoising workflow
The workflow for using denoising software can vary depending on your specific needs and the software you’re using it with. However, most photographers would recommend denoising as an initial step on RAW files prior to any further processing. Here are some steps using Lightroom Classic that you can consider.
- Open your image in Lightroom Classic.
- Transfer the photo to either Topaz or DXO using the Lightroom Classic interface under the Photo tab-edit in, for Topaz, or the File tab-plugin extras for DXO.
- Lightroom Classic will automatically create a TIFF file and open it in the respective program.
- Both programs work on unaltered RAW files and should be done as an initial step in your processing workflow. Adjust the noise reduction settings, and select the location and output file format. Both programs offer other options, such as photo sharpening, that can be done at the same time. Sharpening can affect the perception of noise in a photo, so doing both together often achieves better results.
- Preview the changes in the software interface to see how the noise reduction affects the image. Both programs provide a before-and-after slider interface to make this quite easy.
- Be very careful with the amount of noise reduction you apply. Too much causes an unnatural, blurred painterly appearance.
- Once you’re satisfied with the results, save the image and return it to Lightroom Classic for further editing.
- Save your final image in your preferred file format.
Remember to experiment with different settings in the software. they can be extensive and practice is needed to achieve the best results for your specific image.
I own and use, almost daily, all three of the software programs mentioned above. I prefer Adobe Lightroom Classic for my main editing program. It is the best in my opinion, with a straightforward, intuitive, and easy-to-learn interface. As of this writing, Lightroom version 15.3.1 has noise reduction that is AI-driven in the detail module. The results are as good, in my opinion, as the other products mentioned. Both Topaz Photo AI and DXO Pure Raw 6 give excellent results and may render that result slightly faster than Lightroom. Both have a plugin and can be used seamlessly with Lightroom. I do find, however, that I prefer one program over the other for certain photographs. I often experiment with each program to see which gives the best result for a particular photograph. If your budget constrains you to just one program, I would stick with Lightroom Classic.
In conclusion, noise is an inevitable aspect of wildlife photography, particularly when shooting in low light or at high ISO settings. However, with the use of post-processing programs and techniques, you can effectively reduce or even eliminate noise from your images, resulting in cleaner, sharper, and more professional-looking photographs. Whether you choose to use dedicated noise reduction software or integrate noise reduction into your existing workflow, understanding the underlying principles of noise reduction and how to apply them to your wildlife photography can significantly improve the quality of your final images. With patience, practice, and a little bit of technical know-how, you can create stunning wildlife photos that capture the beauty and majesty of the natural world.